

Picture this: a customer emails to let you know their name is misspelled on your website. No big deal, right? You just need to log in and fix it.
Except…you can’t. Once you sit down at your computer, you realize you have no idea where that login is, what email you used, or where the password ended up (maybe on an ancient sticky note somewhere?).
That sinking feeling? Super common. And the good news is that it is also very fixable. In this post, I’ll walk you through the key website details to keep handy, so you can make updates faster and avoid the 10pm where’s-my-login crash out.
Why Your Website Login Details Matter
Beyond making your website easier to manage, having this information organized and easy to find:
- ⏰ Saves you time. No more late-night scrambling or endless email searches. When something breaks, you can log in right away, whether that means fixing a typo, updating a page, or taking a minute to test your contact form.
- 💰 Saves you money. Getting back to work faster means you don’t have to pay someone else to dig up details you already have (somewhere?). That’s money (and energy) you can put back into your actual work.
- 😎 Puts you in control. This one’s the biggie. Your website is an important business asset, and having these details ready means you can log in (or share access) whenever it really counts.
4 Website Details You Should Always Have on Hand
There’s a few categories of information you want to have handy, so let’s go through them one by one:
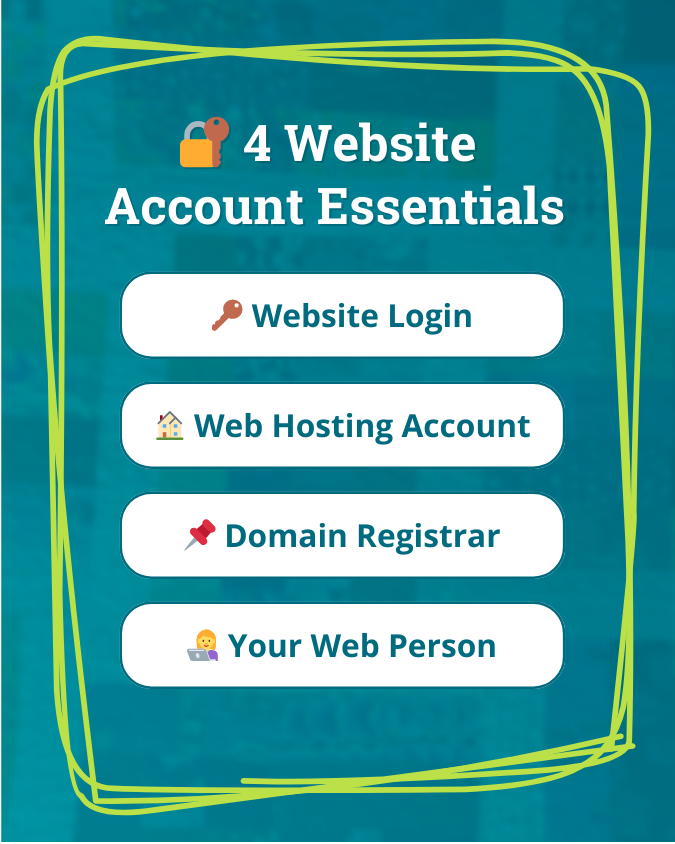
1. Your Website Login 🔑
Your website login page is where you go to edit your site. If you use WordPress, for example, the URL will be something like yoursite.com/wp-admin.
On all-in-one platforms like Squarespace, Wix, and Shopify, this may be the same login you use for your hosting account (see #2 below).
Once you find the correct page, make note of the URL as well as your username and password.
Note: If you can’t figure out the correct login URL, try searching your email for phrases like “[yoursite.com] login” or the name of your website platform.
2. Your Website Hosting Login 🏠
Your web hosting account is what keeps your website live on the internet. Like I mentioned above, sometimes this uses the same login as your website (like Squarespace, Wix, or Shopify).
Once you figure out your host, make note of their login URL as well as your username and password.
Note: If you’re not sure, try searching for “[yoursite.com] hosting” or the name of your website platform. You are likely paying them monthly or yearly, so there is a good chance you will spot a recent receipt.
3. Your Domain Registrar Login 📌
Your domain name is your website address (yoursite.com), and your domain registrar is the company you bought that domain name from.
This is commonly someone like GoDaddy, Namecheap, or Squarespace. It is also possible that your web host (#2 above) registered the domain for you, so if you can’t find anything else, that is a good place to check.
Once you find the info, be sure to note the login URL along with your username and password.
Note: Try searching your email for “[yoursite.com] registration” or the name of your domain provider. If it is not bundled with your hosting, you are probably paying for it yearly (or every few years), so look for a receipt.
4. Your Website Support Contact 👩💻
Did you work with a web designer or developer to create your website? Do you have someone you can call, text, or email if you get stuck?
If so, make note of their contact information too. They may also be the person handling your domain registration or hosting, so if you can’t find that information anywhere else, they are a good place to start.
How to Store Website Login Details Safely
When you’re ready to organize your website details, here are a few options to make sure they stay secure but still easily accessible:
- Use a password manager
- Services like Bitwarden or 1Password are secure and organized.
- You can label each login precisely and add notes where needed.
- Store it digitally
- Save your details in a password-protected Google Doc, Word file, or even in your Notes app if that works best for you.
- Simple, low-cost, and much better than leaving everything scattered across old emails.
- Print a copy
- I created a 100% free PDF (no email required) that you can print, fill out, and keep somewhere safe.
- Or create a document with the details, print it out, and then delete the file.
Remember: The best system is the one you’ll actually use…just try to avoid keeping these details in random emails or sticky notes.
If you do just one thing for your website this week, let it be this. Taking a few minutes to organize this information now can save Future You a lot of time, frustration, and late-night scrambling. And if you want another simple task after that, grabbing 15-Minute Website Wins is a great next step.
Want Help Organizing Your Website Details?
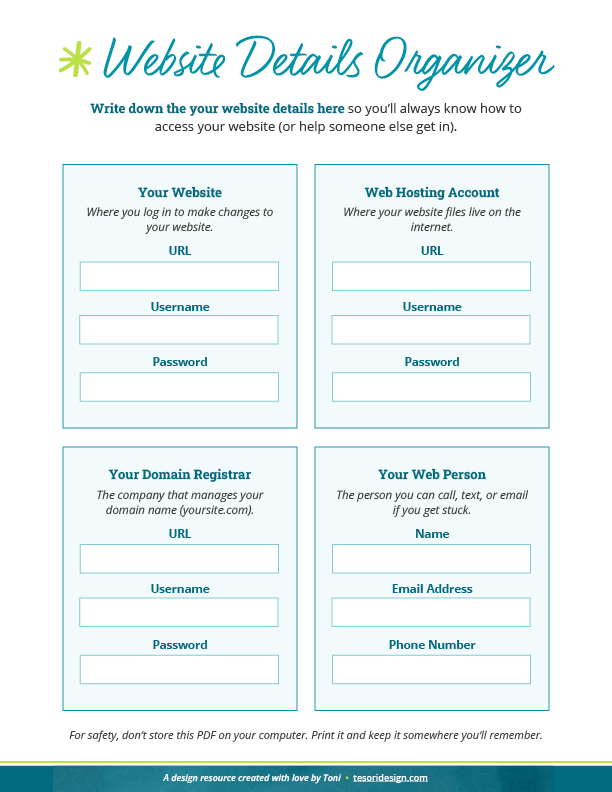
I’m so passionate about this topic that I made a one-page printable Website Details Organizer so you don’t forget a single piece of info. Totally free, no email required – this stuff is *that* important.
Note: The PDF is designed to be printed and then filled in, not saved with sensitive info digitally.